![]() |
| Squish the bean out of its membrane. |
Showing posts with label Recipe. Show all posts
Wednesday, July 8, 2015
Fava Beans: The gift of too much work
I’ve never seen Fava Beans (or Broad Beans as they are known
in English) in our grocery stores. I’ve never known anyone to grow them. I’ve only
read about them. I think that was in Under the Tuscan Sun, but I can’t find the passage to be sure. I remember reading
about this vegetable where everyone in Tuscany or Provence eagerly awaits its early
summer harvest. Like I wait for the first real strawberries of the season or
the hope of a few morels in May. I only had the vaguest notion of what they
were like. Then a few days ago our vegetable farmer friends gave us a gift of
about a pound of fava beans. (Recipes say for a serving you should plan on a
pound of pods per person.) I think I know why they are rare in our country.
Joe and Becca sent along basic instructions. Open the pod.
Inside, find three to five large beans. Remove them. When they are all
collected, blanch them for 30 seconds in boiling water until the membrane
around each bean loosens. Quickly place them in an ice bath. Open the membrane
slightly and squish out the bean. Do this for each one. One at a time, until
you have a small bowlful. Steam them for 3 minutes until tender.
With this little batch I did the simplest thing possible to
taste them. Drizzle with olive oil and sprinkle on a little sea salt and
pepper. I now understand two things. Why Italians love them so much. And why
they are not popular here: too much work. But their buttery flavor and smooth
texture won me completely. It was worth each little step. More, please.
Tuesday, November 19, 2013
Stacked Enchiladas for a cold day
| Stacked Enchiladas ready for the oven |
I have a friend who will soon deliver a new baby - her second child. Liz is also a lively writer and a great cook. She has combined these two skills to make one of the few blogs I regularly read - Carpe Season - "Living seasonally in an under seasoned world." Right now she is trying to prepare her family for an event she knows will change their lives in ways she, well, it is hard to accurately predict what life is going to look like on the other side of second baby, isn't it? I remember someone telling me it's the third one that either makes or breaks you - after that it doesn't matter. She had seven children. I didn't know whether to be relieved or frightened. Even now with adult children I can't say whether that is true or not.
Liz came up with an idea to help her family eat well even as they transit from three to four. She called on some of her friends to send their favorite make-ahead and freeze main dish meals. She plans to make one now and freeze one for later.
I was inspired to send her a family favorite that dates back to our New Mexico days when we lived next door to a Hispanic family. Their Nana made the world's best flour tortillas. Fresh every day. Like it was nothing. Like me toasting a piece of bread. I wish she was still my neighbor. It surprised me that they often made the following dish that was considered lazy, fast, and unauthentic Mexican food. I RARELY, rarely use Campbells cream of anything soup, but for this - I break my rule, unless I have some good leftover chicken broth. This delicious dish can easily be made gluten-free, especially if you make your own cream soup.
This is not difficult to whip up and the ingredients are easily kept on hand for a cold fall day. When served with a side of refried beans, fresh salsa and a simple fruit salad - this is comfort food. Around here, anyway.
Stacked Enchiladas
1 pound ground beef, browned and seasoned with garlic, salt and pepper
10-12 corn tortillas
12 oz grated mild cheddar cheese
1 can green chiles (optional to use more)
1 small onion diced
2 cans cream of chicken soup
1 can milk
Butter two small casserole dishes to make two main dishes that will make three servings each. One to eat now. One to freeze. Or use a larger baking dish to make a main dish that serves approximately five and eat it all at once. Number of servings vary according to appetites. (A cast iron skillet also works well for this recipe.)
Brown the ground beef, set aside. Mix soup and milk in a largish shallow bowl. Grate cheese, set aside. Chop onion, set aside.
To assemble casserole: dip a tortilla in the soup mix so each side is drenched. Place in bottom of dish. Sprinkle a bit of ground beef, 1 T raw onion, 1 T green chile, a little sprinkling of cheese. Repeat layers until the tortillas are used. (In a large casserole dish use 1 1/2 or 2 tortillas. Tear them to fit the shape of bottom.) Pour any remaining soup and a generous amount of cheese over the top. Bake at 350 degrees for 30 minutes or until it bubbles.
Thursday, July 4, 2013
Dangerous Rhubarb Cordial
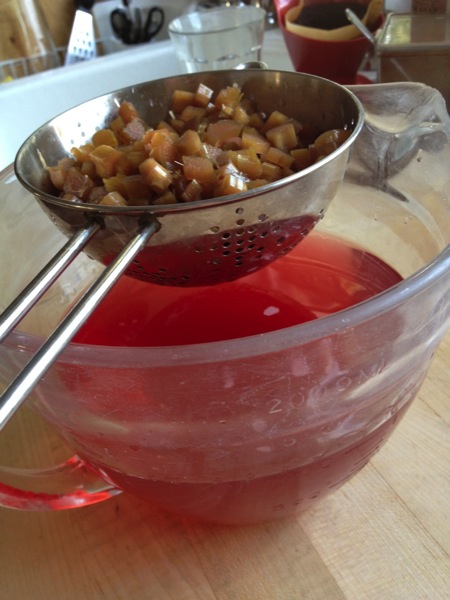
| Last of this season's rhubarb |
We are having a quiet 4th of July. Sandy, a friend from New Zealand, a nurse practitioner, is staying with us for three weeks while she keeps up her annual licensure at Mayo. Another good friend, Larry, from Scottsdale, is here for a month working as a hospitalist and he will join us later. I'm just home from Laity Lodge in Texas where I spent every last spoon of energy I own at a women's retreat. Yesterday I felt like I would never, ever get out of bed again. It was the kind of day when everything made me weep. Like the wren outside our back porch who finally found a mate after singing a solid month before he found her. Cheesh.
Today I'm so much better that the first thing I did was strain the rhubarb cordial that has been brewing on the breakfast nook table for three weeks. (You understand. I have priorities.) A friend sent me this recipe and said to watch out, it is so refreshingly delicious you could drink a quart before you are even aware. Of course, given the ingredients? It wouldn't be long before I was happily unaware of anything. However, due to the company we will keep today, if I were to fall and bump my head, I'd be in good hands.
Hope you all are having a wonderful Fourth and keep your fingers away from lit fuses and hot grills.
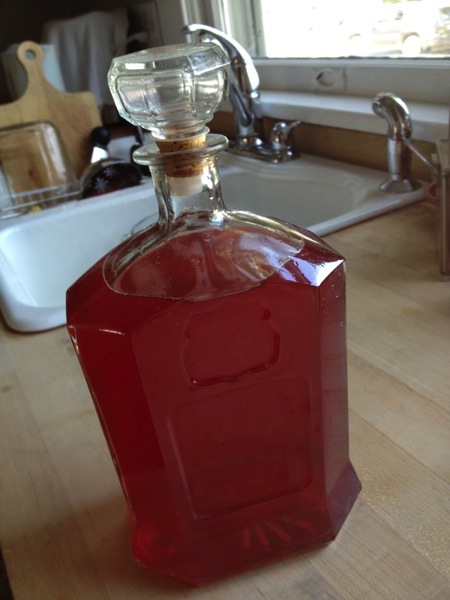
| I'd be pale, too, if I soaked in vodka for three weeks. |
| Ready for ice and soda water. |
Rhubarb Cordial
Bring 6 T sugar and 1/4 cup water to a boil, stirring just until sugar dissolves; remove from heat. Cool Place 5 cups coarsely chopped rhubarb in a two quart glass container. Add 3 cups vodka, 1/2 cup Grand Marnier or other orange-flavored liqueur and cooled sugar syrup; stir. Screw lid on tightly and let stand at room temp for 2-3 weeks or until all the color leaches out of rhubarb. Strain over a bowl, discard solids.
Enjoy it straight up over ice or with club soda. Remember: all things in moderation.
For another great recipe: Sparkling Rhubarb Lemonade link
http://carpeseason.com/sparkling-rhubarb-lemonade/
Wednesday, June 5, 2013
Morchella Eschulenta (Morel Mushrooms)
It has been perfect morel mushroom weather. A cool, moist spring with a few warm days causes this strange woodland treasure to appear for those who have eyes to see and enough stamina to push through miles of thorny vines and masses of tangled brush and trees. Anita and I have tromped through promising woodlands for hours looking and haven't found a single one. The vendors who sell them at Farmers Market have a slightly scornful look for the pitiful folks who step up to pay $30.00 a pound for their springtime addiction. To us it is like junk. White Tiger Heroine from Maynmar. Truffles from France. Etc.
This week I thought maybe we could afford a small treat. You know. A tiny amount. I could buy exactly 9 medium mushrooms - about 1/2 pound. That would give us three each. That is what I planned to do until last Sunday when Joe, our friend from Heartbeet Farm, offered to take us out to a wooded area near their farm.
After two hours of searching and Denis getting lost, we were about to give up when Joe found a large patch poking out of the decay and leaf litter. Denis wrote a beautiful blog about our experience http://www.blog4critique.blogspot.com/. You should go read it now.
It was almost enough to pick them and just fondle them without ever getting to eat. I couldn't bring myself to hope for more, but when Joe insisted we take them all, it felt like Christmas, like strawberries and cream, like unmerited grace.
I can't imagine preparing them any other way than the way my mother taught me. Anything else seems like an awful waste. Sinful. I'd rather have two intense morel-ly bites than a sliver here and there lost in a pasta dish or quiche.
Look how they blend in with surroundings and are very difficult to see.
Happy with a basket FULL of morels. This must be about four meals worth.
First, cut the large ones in half lengthwise and soak in cold salt water about 5 minutes. This drives out little critters hiding in the crevasses. Drain and individually rinse each one under running cold water. Handle gently. Morels are hollow so shake the water out through the stem. Place on a clean dish towel and pat dry. Don't worry about a little dirt in the cracks. It won't hurt you. You need bacterial diversity, don't you?
Mix a simple tempura-like batter.
Batter
1/2 cup flour (Or substitute corn starch to be gluten-free. It takes a little more to get the right consistency.)
1/2 cup milk
1 egg
1/2 t. salt, 1/2 t. garlic salt, pepper
Whisk together in shallow bowl. Should be the consistency of cheap paint. Not too thick. Dip mushrooms in and turn to coat.
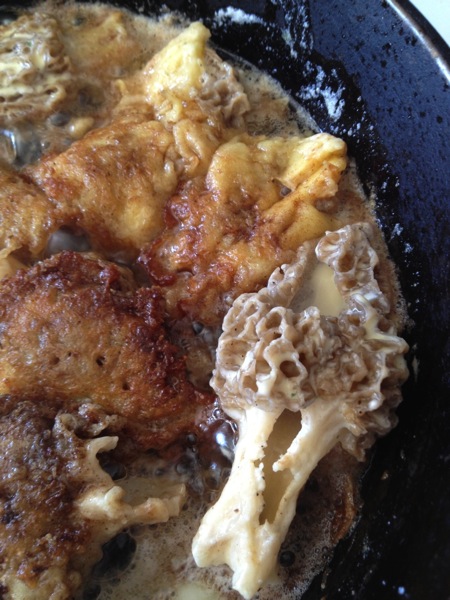
Saute in medium hot skillet with plenty of butter for browning. They should sizzle when placed in pan. Press down on them a little to flatten. Turn when browned and crisp. Doesn't take long. Drain on paper towels. Eat while hot.
Saturday, August 11, 2012
Make Classic Crock Pickles
Cucumbers are sneaky, secretive. We had a plant, just one,
growing beside our back steps this summer and at first it was a lazy little
vine that made blossoms but no fruit. The flowers shriveled and dropped. Turned
out the blossoms needing pollinating. There weren’t enough bees around to do
the job. Anita showed me how to take a tiny paint brush, dip it into a male
blossom and then pass the goodness into a female. She told me how to tell the
difference between them, but I didn’t get it, so I stabbed every one I found
for the week she was gone. Apparently they figured out their chemistry because
this little vine has grown big. Big enough to cover the oregano, wrap around
the sedum and climb the bee balm. Meanwhile it is producing handfuls of sweet,
crisp cucumbers.
A few manage to hide behind a leaf for an extra day or two
until you find them grown to the size of a man’s tube sock. I swear they can do
this overnight. Grow that big. What to
do with them?
Make crock pickles.
I often crave pickles, and as I handled these big ones, I
though of the old wooden pickle barrels that used to sit beside the cash
register of every general store in America. What I didn’t realize is that they
required no refrigeration because the natural fermentation process preserved
them.
You can make your own crock pickles quite easily and the
recipe can be tweaked a little to get it how you them.
This is a method of preserving food that is being recovered.
Cucumbers are especially well adapted to this kind of fermentation, though
other vegetables like onions, carrots pepper are good, too. If you’ve had to do
a course of antibiotics lately, more doctors are now suggesting you replace all
that good bacteria in your gut with probiotics. Millions, billions of those
teeny, tiny seething little organisms that help us digest food and fight off
evil are now dead along with all the bad ones. Our American diets do not
include enough of the beneficial bacteria found in yogurt and pickles and
fermented foods. This could be a start.
So, if you have a few extra cucumbers, now is the time. You
can make a small batch, enough for two quarts. Whet your appetite, pass one of
these to a friend, a kid, a spouse and you may be rewarded with more than just
a little help for the bacteria farm growing in your gut.
Classic Crock Pickles
(makes 2 Quarts)
2 lbs. pickling cucumbers or spears
1 quart water
3 TBSP pickling salt
2 cloves garlic, peeled
2 fronds of fresh seeded dill (or 1 TBSP seed)
1 T mustard seed (optional)
1 tsp celery seed (optional)
1 head of garlic
Oak or grape leaves (preserves crispness)
Soak the cucumbers overnight in cold water.
Sterilize 2 glass quart jars. Add 2 oak or grape leaves, a
frond of dill seed, and several cloves of garlic to each jar.
Combine the water, salt, garlic, mustard and celery seeds in
a bowl and stir to dissolve the salt. This is your pickling brine.
Pack each jar with spears or whole pickling cucumbers,
leaving at least 2 inches of room at the top of each jar.
Pour brine into each jar, filling to the top. All the
cucumbers need to be covered in at least 1” of brine. If you need more liquid, mix 1 TBSP pickling
salt in 1 cup water and add it to the brine to reach the desired volume.
The cucumbers, whether whole or cut in spears, will float
and you need to invent a way to keep them submerged. We found a small round
river rock, sent it through the dishwasher to sterilize it and placed that in
the top of our jars. If you have a small enough plate or seal a bag of dry
beans, anything that will rest on top of the jar to keep them down.
Leave jars at room temp out of direct sunlight. It’s a good
idea to set the jar in a bowl because as the brine works it will bubble and overflow a little. Check the jars every day. As the
fermentation process gets going, bubbles will rise in the brine and you will
see seeds being ferried up and down the pickling liquid. This is a good sign! It means the cucumbers are getting pickled.
A scum will form on the top of the brine every day (also a
good sign!). Skim it off and discard it and clean the rim of the jar so mold
does not form.
When the bubbles stop rising (after a week or so), take out
a pickle and sample it. If it is pickled
to its center, it is done. If it isn’t sour enough or pickled throughout, leave
the jar to sit out another day or two to complete the fermentation. The taste should be sour and salty and if you
speared the cucumbers, the skin should still be crunchy.
Refrigerate the jars when the pickles taste like you want
them to. Refrigeration slows the
fermentation process, but the scum will still form on top of the liquid. Remove
it regularly. They’ll keep for 4-6 months in the refrigerator.
This recipe was tweaked, but originated from Put 'em Up by Sherri Brooks Vinton
Friday, July 6, 2012
My cake is slipping
![]() |
| Lemon Curd Layer Cake. I forgot to the fresh lemon slices on top |
Today I finished making a lemon curd layer cake. I had
promised a celebration birthday cake for
Anita and Marsena, but then life got complicated and I didn’t get around to it
until this week. This recipe is complicated, too. For me, anyway. But if you do
it step by step the resulting cake is memorable. Four days ago I made the
required six cups of lemon curd which is so good you have to hide it from
yourself. Using fresh farm eggs makes the curd bright as oxeye daisies. Yesterday
I made the three cake layers. Today I whipped the cream, blended in some of the
curd and topped each level with curd followed by cream frosting. The final
layer is covered in cream frosting, the remaining curd is spread on the top and
then rest of the whipped cream is piped around the edges. So beautiful.
Maybe because it was too hot in the house, or perhaps it is
just me, but the cake is sitting in the refrigerator slipping its top. Oh, and
another thing, my layers came out of the oven tall and beautiful and promptly
fell. It will still taste marvelous.
Beloved, my projects, my life is never quite perfect.
I’m posting the recipe in case anyone else is in love with
lemon deserts. Just know – you really need to start this a day in advance
because the curd needs to cool and the frosting needs to set up for 3-4 hours. From
Bon Appetite magazine…
Lemon Curd Layer Cake
LEMON CURD
2 1/3 c. sugar
2 tsp cornstarch
1 c. fresh lemon juice
4 large eggs
4 large egg yolks (save whites for cake)
¾ c. (1 ½ sticks) unsalted butter cut in pieces
FROSTING
¾ c. powdered sugar
2 c. whipping cream
CAKE
1 ½ c. cake flour
1 ½ c. sugar
2 ½ tsp baking powder
¾ tsp salt
4 large egg yolks
¼ c vegetable oil
¼ c. orange juice
1 ½ tsp grated lemon peel
8 large egg whites
¼ tsp cram of tartar
Lemon slices, halved, patted dry. ( I forgot them!)
FOR LEMON CURD: Combine 2 1/3 c. sugar and cornstarch in
heavy medium pan. Gradually whisk in fresh lemon juice. Whisk in eggs and
yolks; add butter. Whisk over medium heat until curd thickens and boils, abut
12 min. Pour into container or jars, cover refrigerate. Can be made 1 week
ahead.
FOR FROSTING: Beat powdered sugar and 1 ¼ c. curd in large
bowl just until blended. Beat cream in separate bowl until firm peaks form.
Fold cream into curd mixture in 3 additions. Chill until firm, at least 4
hours.
FOR CAKE: Oven 350 degrees. Butter and flour three 9 inch
cake pans. Line with parchment paper. Whisk dry ingredients – flour, sugar,
salt, b. powder. Add 4 yolks, oil, orange juice, lemon peel and ¾ c. curd.
(Don’t beat it quite yet because you need to use mixer to beat egg whites.) In
another large bowl combine egg whites and cream of tartar. Beat whites until
soft peaks form. Gradually add remaining cup of sugar, beating until stiff.
Using same beaters, beat yolk mix until smooth. Fold whites into yolk mixture
in three additions. Divide batter into the three pans. Bake about 25 min. or
until toothpick comes out clean. Cool in pan 15 min. Turn onto racks, peel off
parchment. Cool completely.
Spoon 1 c. frosting into pastry bag fitted with plain round
tip. Refrigerate while you put the rest together. Place 1 layer on cake plate.
Spread top with 1/3 c. curd and 1 c. frosting. Do same with the next. Top with
third layer and spread remaining frosting over top and sides. Spread remaining
curd on the top leaving a ¾ inch border around. Pipe little mounds of chilled
bagged frosting around edge. Place lemon slices between mounds. Can be made a
day ahead.
Friday, June 15, 2012
Gluten/Dairy Free Cilantro Lime Sauce
Tomorrow we are leaving for the cabin for a few days. Some
of our family will be joining us and we are really looking forward to seeing
them. Since the cabin is about 30 miles from town we plan food ahead and hope
we don’t have to resort to eating bony little crappies and burdock roots. So I
am doing some make-ahead recipes. Denis wants to do an antipasto plate and
asked me make this cool sauce to go with it.
Seems like more and more people, well at least ones I know, (our
family included) have food issues, like needing to be gluten-free or dairy-free.
Two reasons to like this sauce. Plus it goes well with grilled chicken or fish
or fresh vegetable sticks or even chips. Gasp.
I was surprised to find it in Food & Wine Magazine (May Issue) in a column about chefs’
favorite off-the-path cafes. One of them mentioned Brasa in St. Paul and I
recognized it, more surprise, surprise. That’s a big no-no for me. That I would
not only recognize, but have eaten at a place they recommend? I love to hate that
publication because they can make an idolatry out of pig bellies, and of course
wouldn’t allow me to enter their precious establishments because I wear Land’s End sandals. Anyway, Brasa’s is a
place we’ve often eaten at because it’s affordable, and we like their faux
Caribbean menu and rotisserie chicken that comes with a sauce accompaniment. So
what do you know, they publish the recipe for the sauce! And now I have to
temper my judgment. Sorry. Sorry.
Creamy Cilantro Lime Sauce is quick and easy to make. You
can cut back on the heat by getting milder peppers or reducing the amount. Last
time I made it, it was so hot we had to cut the heat by adding more mayonnaise.
And what is weird? Denis LIKES it even though he HATES cilantro.
Creamy Cilantro Lime
Sauce
2 large jalapenos, seeded and chopped (I cut back on this.
Too many Scandinavians around here.)
2 large garlic cloves, smashed
2 T minced fresh ginger
2 T minced onion
1 T fresh lime juice
¼ c. water
1 c. mayonnaise
1.4 c. finely chopped cilantro
Salt
In a blender, puree the peppers, garlic, ginger, onion, lime
juice and water until smooth.Add the moy and cilantro and pulse a few times.
Season with salt. Serve. Will keep in refrigerator for several days. I can’t say
how long. Mine has kept a week. It also makes a good salad dressing.
Wednesday, May 9, 2012
Simply Water
These days, nothing tastes better than this water. (I’ve
been drinking heavily during my absence from this blog.) I think it really
could be called artisan water. Artisan –
meaning hand-made in small batches – another word hi-jacked by marketeers
and ad-people.
It’s simple enough, and maybe everyone else already knows to
do this or isn’t interested. Our niece, Mary Blount Lapp, served it from large
glass jars at her beautiful outdoor wedding reception in Lancaster County, PA. In one hour I drank twice the
recommended daily amount. Couldn’t stop. Still can’t. The combined flavors are
so refreshing they stir memories of cold, sweet water drank from a spring near
a lake on a hot day years ago.
Mary’s Water
1 gallon filtered water
3-4 thin slices lime
5 thin slices cucumber
2 small sprigs of mint
Refrigerate til icy cold.
Obviously, adjust to taste.
Mary & Ernie's outdoor wedding reception on the hillside of their friends' farm.
Monday, March 26, 2012
Cookie Rabbits
This weekend we were busy making and decorating sugar cookies for kids. There may be one or two left to share. Denis mixed up black icing to reflect, what? Lent? Black crosses, bunnies outlined in dark. Blackened hearts.
Sadly, there were also a few rabbit injuries in the Toad Hall kitchen.
One of them was heard to say:
“My butt HURTS.”
The second one replied:
“What?”
They required immediate attention.
Here’s a recipe for a glazed icing that hardens to a lovely shiny surface. Many of you knew how to do this, but no one told me until recently. I love how it works.
Cookie Icing
1 c. powdered sugar
2 t. milk
2 tsp light corn syrup (this is the secret ingredient, a must)
½ t almond extract
Stir together the sugar and milk until smooth. Beat in corn syrup and extract until icing is smooth and glossy. If too think add small equal amounts of milk and syrup. Divide into separate bowls and add food coloring to each to desired intensity. Dip cookies or paint with a brush. Allow the cookies to set out for a few hours before storing them in layers separated by wax paper.
Saturday, March 10, 2012
Scrapple me to death
It’s done. I’m feeling proud and superior. From one pig’s head and a few neck bones, I pulled six cups of meat which I then minced. I strained the broth to remove large pieces of congealed, um, offal? It was repulsive. It included a couple of tusk-like teeth that fell out of the jaw – the rest I hammered out. (I have ideas for the teeth. Like drilling holes in them, stringing them on leather and sending them to a friend who has a javelina phobia. Donald, this will help you if you wear them next to your skin, especially when you teach “domains of learning.” It’s called desensitization therapy.)
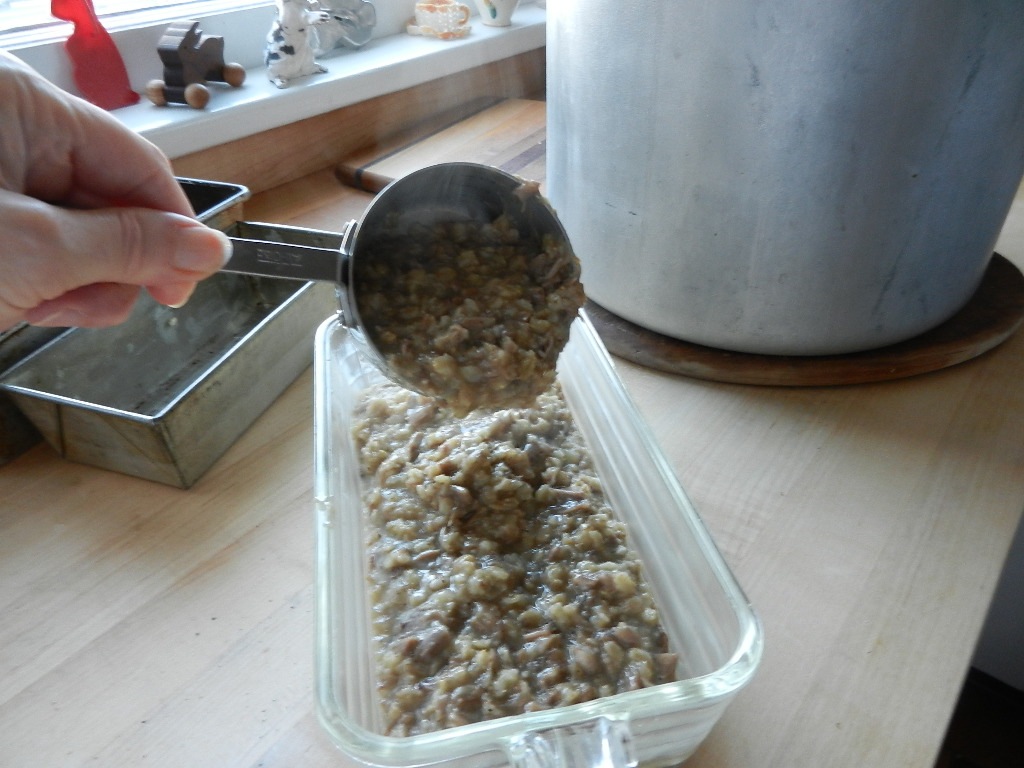
I set the broth on the porch to cool overnight. This morning the fat was congealed enough to peel a layer off the surface. The broth is so full of collagen from the bones it sits up like industrial strength Jell-O. It measured a little more than seven cups and since the recipe is roughly equal parts meat to oatmeal – I cooked up seven cups of thick-cut organic oatmeal. When it was well-done, I added the minced meat, salt and quite a bit of pepper and put it in the refrigerator. My mom insists it needs a lot of pepper. I waited barely long enough for it to set and then cut it into half inch slices, browned it in a hot cast iron skillet. I squished the slices down a little – I think that when I freeze it, it will slice easier and not be so mushy in the pan. When it was all crisped up, it went on a plate to be served with maple syrup.
An inexpensive, nutritious dish with a balance of protein, carbs, fiber, fat, B vitamins and minerals. Hey?
It was better than I remembered. Denis and Anita were eager to try it, but I could see the tentative first bite of will I have to make a run to the trash can with my hand over my mouth? or, or, or, and then their eyes lit up. They groaned, and ate every little scrap. ha. Denis suggested I see about getting eight or ten of these, because surely there is no competition for making use of a pig’s head. I was a little horrified. No. I’m sorry. No. I’ll teach him if he wants do that many.
Scrapple
One pig’s head, washed (Chicken backs and necks may be substituted for pork)
Oatmeal
Water
Salt
Pepper
Place head in a large pot. Cover with water and bring to a boil. Simmer for two hours or until meat is tender and skin slips off the bones. Cool. Remove head from pot reserving the cooking liquid.
Separate meat from skin, cartilage, and bones. Discard brains and tongue. Dice meat into small pieces and save in a large mixing bowl. Be sure to include some of the fat. Measure amount of scraps and make an equal amount of oatmeal using the left over liquid. Bring it to a boil in a large pan and for each cup of liquid add 1/3 cup of oatmeal. Simmer until oatmeal has thickened. Add meat scraps and fat to the oatmeal. Mix well and season with salt and lots of pepper. Spoon mixture into bread pans and refrigerate until set. Unmold from pan, cut into ½ inch slices and brown in frying pan until crisp.
Serve for breakfast with maple syrup. May be frozen until needed.
Tuesday, December 27, 2011
Gluten-Free Coconut Macaroons
Today I’m cleaning out the crumbs of sweets left from the holidays. Tossing the dried out coffee cake from Christmas morning, the shortbread is in the freezer, and I’m undecided about the coconut macaroons. Maybe I’ll just let them be in the refrigerator a little longer. I may need a teeny little sugar high.
One of the candies I forced my children to tithe after Halloween was Mounds Bars. Mounds Bars always get me with their creamy milk chocolate covering that sinks under your teeth and mashes into the soft white inside. Bits of it stick in your teeth for hours waiting to be horsed out for further enjoyment. It’s never clicked that I could make coconut macaroons myself. Maybe because most homemade or purchased macaroons are like choking down cattail fuzz with dried broom grass. So it was only this year that I decided to research and try them, mostly because (she says) it’s a treat that can be given to friends who need to stay gluten-free.
I know we’re all probably sick to death of Christmas cookies and candies. I pretty much am. But if I don’t post this now, I’ll forget. And who knows? You may need something for a New Year’s Eve party.
I fell in love with this dangerous recipe from A Homemade Life by Molly Wizenberg, because it is very easy and tastes way better than any I’ve ever had. The coconut base is moist and tender, crispy on the outside and you can either drizzle or dip them in a perfect coat of chocolate. Her way of making chocolate glaze is genius: another no-fail idea to use for other recipes that require a chocolate glaze.
Chocolate-Covered Coconut Macaroons
Adapted from Bon Appétit (September 2002) and the Marigold Kitchen of Madison, Wisconsin
3 cups (lightly packed) sweetened shredded coconut
¾ cup granulated sugar
¾ cup egg whites (about 5 or 6 large)
1 ½ tsp pure vanilla extract
¼ tsp almond extract (I leave this out. Not a fan of almond extract.)
8 ounces bittersweet or semisweet chocolate, finely chopped
3/4 cup heavy cream
Place the first three ingredients in a heavy saucepan, and stir to combine well. Cook over medium-low heat, stirring regularly, about 10-12 minutes, until the mixture is pasty but not dry. (It will look sort of granular at first, then creamy as it heats, and then it will slowly get drier and drier. Stop cooking when it no longer looks creamy but is still quite gluey and sticky, not dry.) Remove from heat. Mix in vanilla and almond extracts. Spread out the coconut mixture on a large baking sheet. Refrigerate until cold, about 30 minutes. (Don’t skip this step – it makes it so much easier to handle.)
Adapted from Bon Appétit (September 2002) and the Marigold Kitchen of Madison, Wisconsin
3 cups (lightly packed) sweetened shredded coconut
¾ cup granulated sugar
¾ cup egg whites (about 5 or 6 large)
1 ½ tsp pure vanilla extract
¼ tsp almond extract (I leave this out. Not a fan of almond extract.)
8 ounces bittersweet or semisweet chocolate, finely chopped
3/4 cup heavy cream
Place the first three ingredients in a heavy saucepan, and stir to combine well. Cook over medium-low heat, stirring regularly, about 10-12 minutes, until the mixture is pasty but not dry. (It will look sort of granular at first, then creamy as it heats, and then it will slowly get drier and drier. Stop cooking when it no longer looks creamy but is still quite gluey and sticky, not dry.) Remove from heat. Mix in vanilla and almond extracts. Spread out the coconut mixture on a large baking sheet. Refrigerate until cold, about 30 minutes. (Don’t skip this step – it makes it so much easier to handle.)
Line another baking sheet with parchment paper. Using a ¼-cup measuring scoop, scoop and pack the coconut mixture into domes, and place them on the baking sheet. (I use my hands. You can also make them smaller.) You should wind up with about a dozen. Bake at 300 degrees until the macaroons until golden, about 30 minutes. Transfer to a rack and cool. You can even bake them a little longer if you like them a little more crisp on the outside.
Set cookies on rack over a rimmed baking sheet. Place the chopped chocolate in a medium bowl. Heat the heavy cream in a small saucepan until it is very hot and steamy (not boiling), remove from the heat, and pour it over the chocolate. Whisk until the mixture is smooth and the chocolate is thoroughly melted. Spoon the glaze over the macaroons, covering them almost completely and allowing the chocolate to drip down the sides. [You will have leftover glaze, which can be refrigerated or frozen.] Refrigerate the macaroons until the glaze sets, at least 2 hours. Transfer the macaroons to an airtight container, and refrigerate or freeze.
Friday, October 28, 2011
Cannibal Jack
We have a challenge. Denis is supposed to carve a jack-o’-lantern with a theological theme. Anita is going to do a bunny-pumpkin. I did mine last night - a cannibalizing zombie eating one of our pie pumpkins. I think it will win. We have friends coming from NY who, I’ll bet will be impressed with our level of sophistication. They will judge.
This year I saved the seeds and roasted them. It’s easy to do. They are really addictive and good for fiber and lowering cholesterol. This will help balance out the left-over treats, I plan to eat this year. I always debate: should I buy crap candy so I won’t be tempted to eat what doesn’t get passed out. Or buy what I love so I can treat myself for days following. The basket with mini-Hershey bars, Peanut Butter Cups and Mounds Almond Bars are waiting by the front door.
Roasted Pumpkin Seeds
Put the seeds in a colander and rinse them. Pick out the larger bits of pumpkin innards.
Place them in a baking pan. (I use my largest cast iron skillet for this.)
Drizzle 1 T. olive oil.
Sprinkle with salt to taste.
Place in 350 degree oven for 18 minutes. Stir. Check degree of crispness. If not crunchy, bake for another 10 minutes or until desired crunch is reached.
Just these two pumpkins made about 3 cups of roasted seeds.
Wednesday, October 5, 2011
Pasteurized Processed Cheese Spread
I follow the “Amish Cook,” a syndicated column written by Lovina Eicher, an Old Order Amish woman and mother of eight children living in Michigan. There is nothing special about her writing, as it is nearly always a mere accounting of what the family is doing: what daughter is hanging laundry or sweeping the kitchen, the menu when they visited sister Emma and husband Jacob, what is being grown or canned from the garden, who is cleaning the barn. I think my fascination is with the life they lead, which we think of as simple, or plain, as they would say, but it is no romantic dream-deal.
I also mistakenly assumed the Amish are as strict with their eating as they are with their dress. But in this they’re like a lot of ordinary folk: big on sugar and white bread. I wait for mildly shocking recipes like this.
Church Cheese Spread
6 pounds Velveeta cheese
1 ½ cups butter
8 cups cream
Put everything in a roaster and bake at 200 degrees, stirring every 15 minutes until melted. Cover with plastic wrap to prevent from getting crusty top as it cools. Serve on a sandwich with or without meat.
This was made in large quantity for the lunch after a church service. Once or twice a year each family in the community must take a turn hosting the church service on their farm.
Subscribe to:
Posts (Atom)